

How to Install the Latest Nginx, MariaDB, and PHP on Debian and Ubuntu
Learn how to install the latest Nginx, MariaDB, and PHP (LEMP Stack) on Debian and Ubuntu.

In this blog post, you will learn how to install the latest Nginx, MariaDB, and PHP (LEMP Stack) on Debian and Ubuntu.
Introduction
When a new stable version of Debian is coming to be released, a freeze policy is implemented. This means that the Debian packaging team locks the versions of all software, and for the next two years, you won't be able to upgrade to the latest versions through the official repositories. While some software may receive updates through Debian backports, many others will not.
For certain web applications, such as those relying on Nginx, MariaDB (MySQL), or PHP, you may need the latest software versions. In this article, I will guide you through the process of installing the latest versions of these essential web server components on Debian and Ubuntu.
1. Prerequisites
Make sure you have installed Debian Stable (either oldstable or stable releases, sid is not supported) or Ubuntu LTS (Interim not supported).
For the installation process, I will switch to the root user by sudo -i or su root.
However, I highly recommend avoiding the use of the root account for daily operations to maintain better security practices.
First, update your system to the latest packages and install some required software.
apt update -y
apt upgrade -y
apt full-upgrade -y
apt install curl vim wget gnupg dpkg apt-transport-https lsb-release ca-certificates -y
Update system
2. Install Nginx
We maintain a project called N.WTF, which syncs the official Nginx source code and packages, while using the latest version of OpenSSL.
2.1 Add GPG key
curl -sS https://n.wtf/public.key | gpg --dearmor > /usr/share/keyrings/n.wtf.gpgAdd N.WTF GPG Key
2.2 Add repository
echo "deb [arch=$(dpkg --print-architecture) signed-by=/usr/share/keyrings/n.wtf.gpg] https://mirror-cdn.xtom.com/sb/nginx/ $(lsb_release -sc) main" > /etc/apt/sources.list.d/n.wtf.listAdd N.WTF repository
2.3 Update system and install Nginx
apt update
apt install nginx-extras -y
Install Nginx
Now we can see Nginx is installed:
root@debian ~ # nginx -v
nginx version: nginx-n.wtf/1.27.5
Latest Nginx Mainline
3. Install PHP
We install PHP packages from Ondřej Surý, who maintains PHP packages for both Debian and Ubuntu.
3.1 Add GPG key and repository
Debian:
wget -O /usr/share/keyrings/deb.sury.org-php.gpg https://packages.sury.org/php/apt.gpg
echo "deb [arch=$(dpkg --print-architecture) signed-by=/usr/share/keyrings/deb.sury.org-php.gpg] https://packages.sury.org/php/ $(lsb_release -sc) main" > /etc/apt/sources.list.d/php.list
Add GPG key
For Ubuntu, we can directly use Ondřej Surý’s PPA to install the latest PHP packages:
add-apt-repository ppa:ondrej/phpUbuntu PPA
3.2 Install specific PHP version
Avoid installing php-* packages directly, because the version installed might not match the requirements of your application, potentially causing compatibility issues.
First, update your system to the latest packages.
apt updateUpdate system
Then, install the specific PHP version and extensions you need. In this example, I’ll show a setup suitable for a WordPress blog:
Install PHP 8.4
apt install php8.4-{fpm,cli,mysql,curl,gd,mbstring,xml,zip,imap,opcache,soap,gmp,bcmath} -yInstall PHP 8.4
Install PHP 8.3
apt install php8.3-{fpm,cli,mysql,curl,gd,mbstring,xml,zip,imap,opcache,soap,gmp,bcmath} -yInstall PHP 8.3
Install PHP 8.2
apt install php8.2-{fpm,cli,mysql,curl,gd,mbstring,xml,zip,imap,opcache,soap,gmp,bcmath} -yInstall PHP 8.2
Install PHP 8.1
apt install php8.1-{fpm,cli,mysql,curl,gd,mbstring,xml,zip,imap,opcache,soap,gmp,bcmath} -yInstall PHP 8.1
Warning: The PHP versions listed below are EOL and are no longer officially supported.
Install PHP 8.0
apt install php8.0-{fpm,cli,mysql,curl,gd,mbstring,xml,zip,imap,opcache,soap,gmp,bcmath} -yInstall PHP 8.0
Install PHP 7.4
apt install php7.4-{fpm,cli,mysql,curl,gd,mbstring,xml,zip,imap,opcache,soap,gmp,bcmath} -yInstall PHP 7.4
Install PHP 7.3
apt install php7.3-{fpm,cli,mysql,curl,gd,mbstring,xml,zip,imap,opcache,soap,gmp,bcmath} -yInstall PHP 7.3
Install PHP 7.2 (mcrypt is deprecated since PHP 7.2)
apt install php7.2-{fpm,cli,mysql,curl,gd,mbstring,xml,zip,imap,opcache,soap,gmp,bcmath} -yInstall PHP 7.2
Install PHP 7.1
apt install php7.1-{fpm,cli,mysql,curl,gd,mbstring,mcrypt,xml,zip,imap,opcache,soap,gmp,bcmath} -yInstall PHP 7.1
Install PHP 7.0
apt install php7.0-{fpm,cli,mysql,curl,gd,mbstring,mcrypt,xml,zip,imap,opcache,soap,gmp,bcmath} -yInstall PHP 7.0
Install PHP 5.6
apt install php5.6-{fpm,cli,mysql,curl,gd,mbstring,mcrypt,xml,zip,imap,opcache,soap,gmp,bcmath} -yInstall PHP 5.6
Feel free to search for and install any other PHP extensions you may require:
apt search php8.4-*Search PHP 8.4 extensions
Now, let's update some values in the php.ini file:
- For PHP 8.4, you can modify the configurations in
/etc/php/8.4/fpm/php.ini. - For PHP 7.4, the file is located at
/etc/php/7.4/fpm/php.ini. - Similarly, adjust the path based on the PHP version you are using.
Fix cgi.fix_pathinfo for PHP-FPM:
Make sure to properly configure cgi.fix_pathinfo settings to enhance security and application compatibility.
sed -i 's/;cgi.fix_pathinfo=1/cgi.fix_pathinfo=0/' /etc/php/8.4/fpm/php.ini Fix `cgi.fix_pathinfo`
Adjust upload and post limits:
Modify the upload_max_filesize and post_max_size values in your php.ini file as needed for your applications.
sed -i 's/upload_max_filesize = 2M/upload_max_filesize = 10M/' /etc/php/8.4/fpm/php.ini
sed -i 's/post_max_size = 8M/post_max_size = 10M/' /etc/php/8.4/fpm/php.ini
Adjust upload limits
Install multiple versions of PHP:
You can install multiple PHP versions and set a default version using the following command:
update-alternatives --config phpSet a default PHP version
Restart the PHP-FPM service after modifying configurations:
Be sure to restart the PHP-FPM service to apply the changes:
systemctl restart php8.4-fpmRestart PHP 8.4 FPM
Now, let's add a Nginx site configuration:
Create a new configuration file for your site under /etc/nginx/sites-available/ :
cat >> /etc/nginx/sites-available/example.com.conf << EOF
server {
        listen 80;
        listen [::]:80;

# Web files folder, I recommend using /var/www
        root /var/www/example.com;
        index index.php index.html index.htm;

# Replace example.com to your domain name
        server_name example.com;

        location / {
            try_files \$uri \$uri/ =404;
        }

# Enable PHP8.4-fpm , if you are using PHP 7.4, just change to fastcgi_pass unix:/run/php/php7.4-fpm.sock;
        location ~ \.php$ {
            include snippets/fastcgi-php.conf;
            fastcgi_pass unix:/run/php/php8.4-fpm.sock;
        }
}
EOF
/etc/nginx/sites-available/example.com.conf
Link the configuration file to the /etc/nginx/sites-enabled folder:
ln -s /etc/nginx/sites-available/example.com.conf /etc/nginx/sites-enabled/example.com.confLink to /etc/nginx/sites-enabled/
Then reload Nginx to apply the changes:
nginx -t
nginx -s reload
Reload Nginx
Create the website root directory /var/www/example.com and set permission to user and group to www-data :
mkdir -p /var/www/example.com
chown www-data:www-data /var/www/example.com -R
Create website root directory
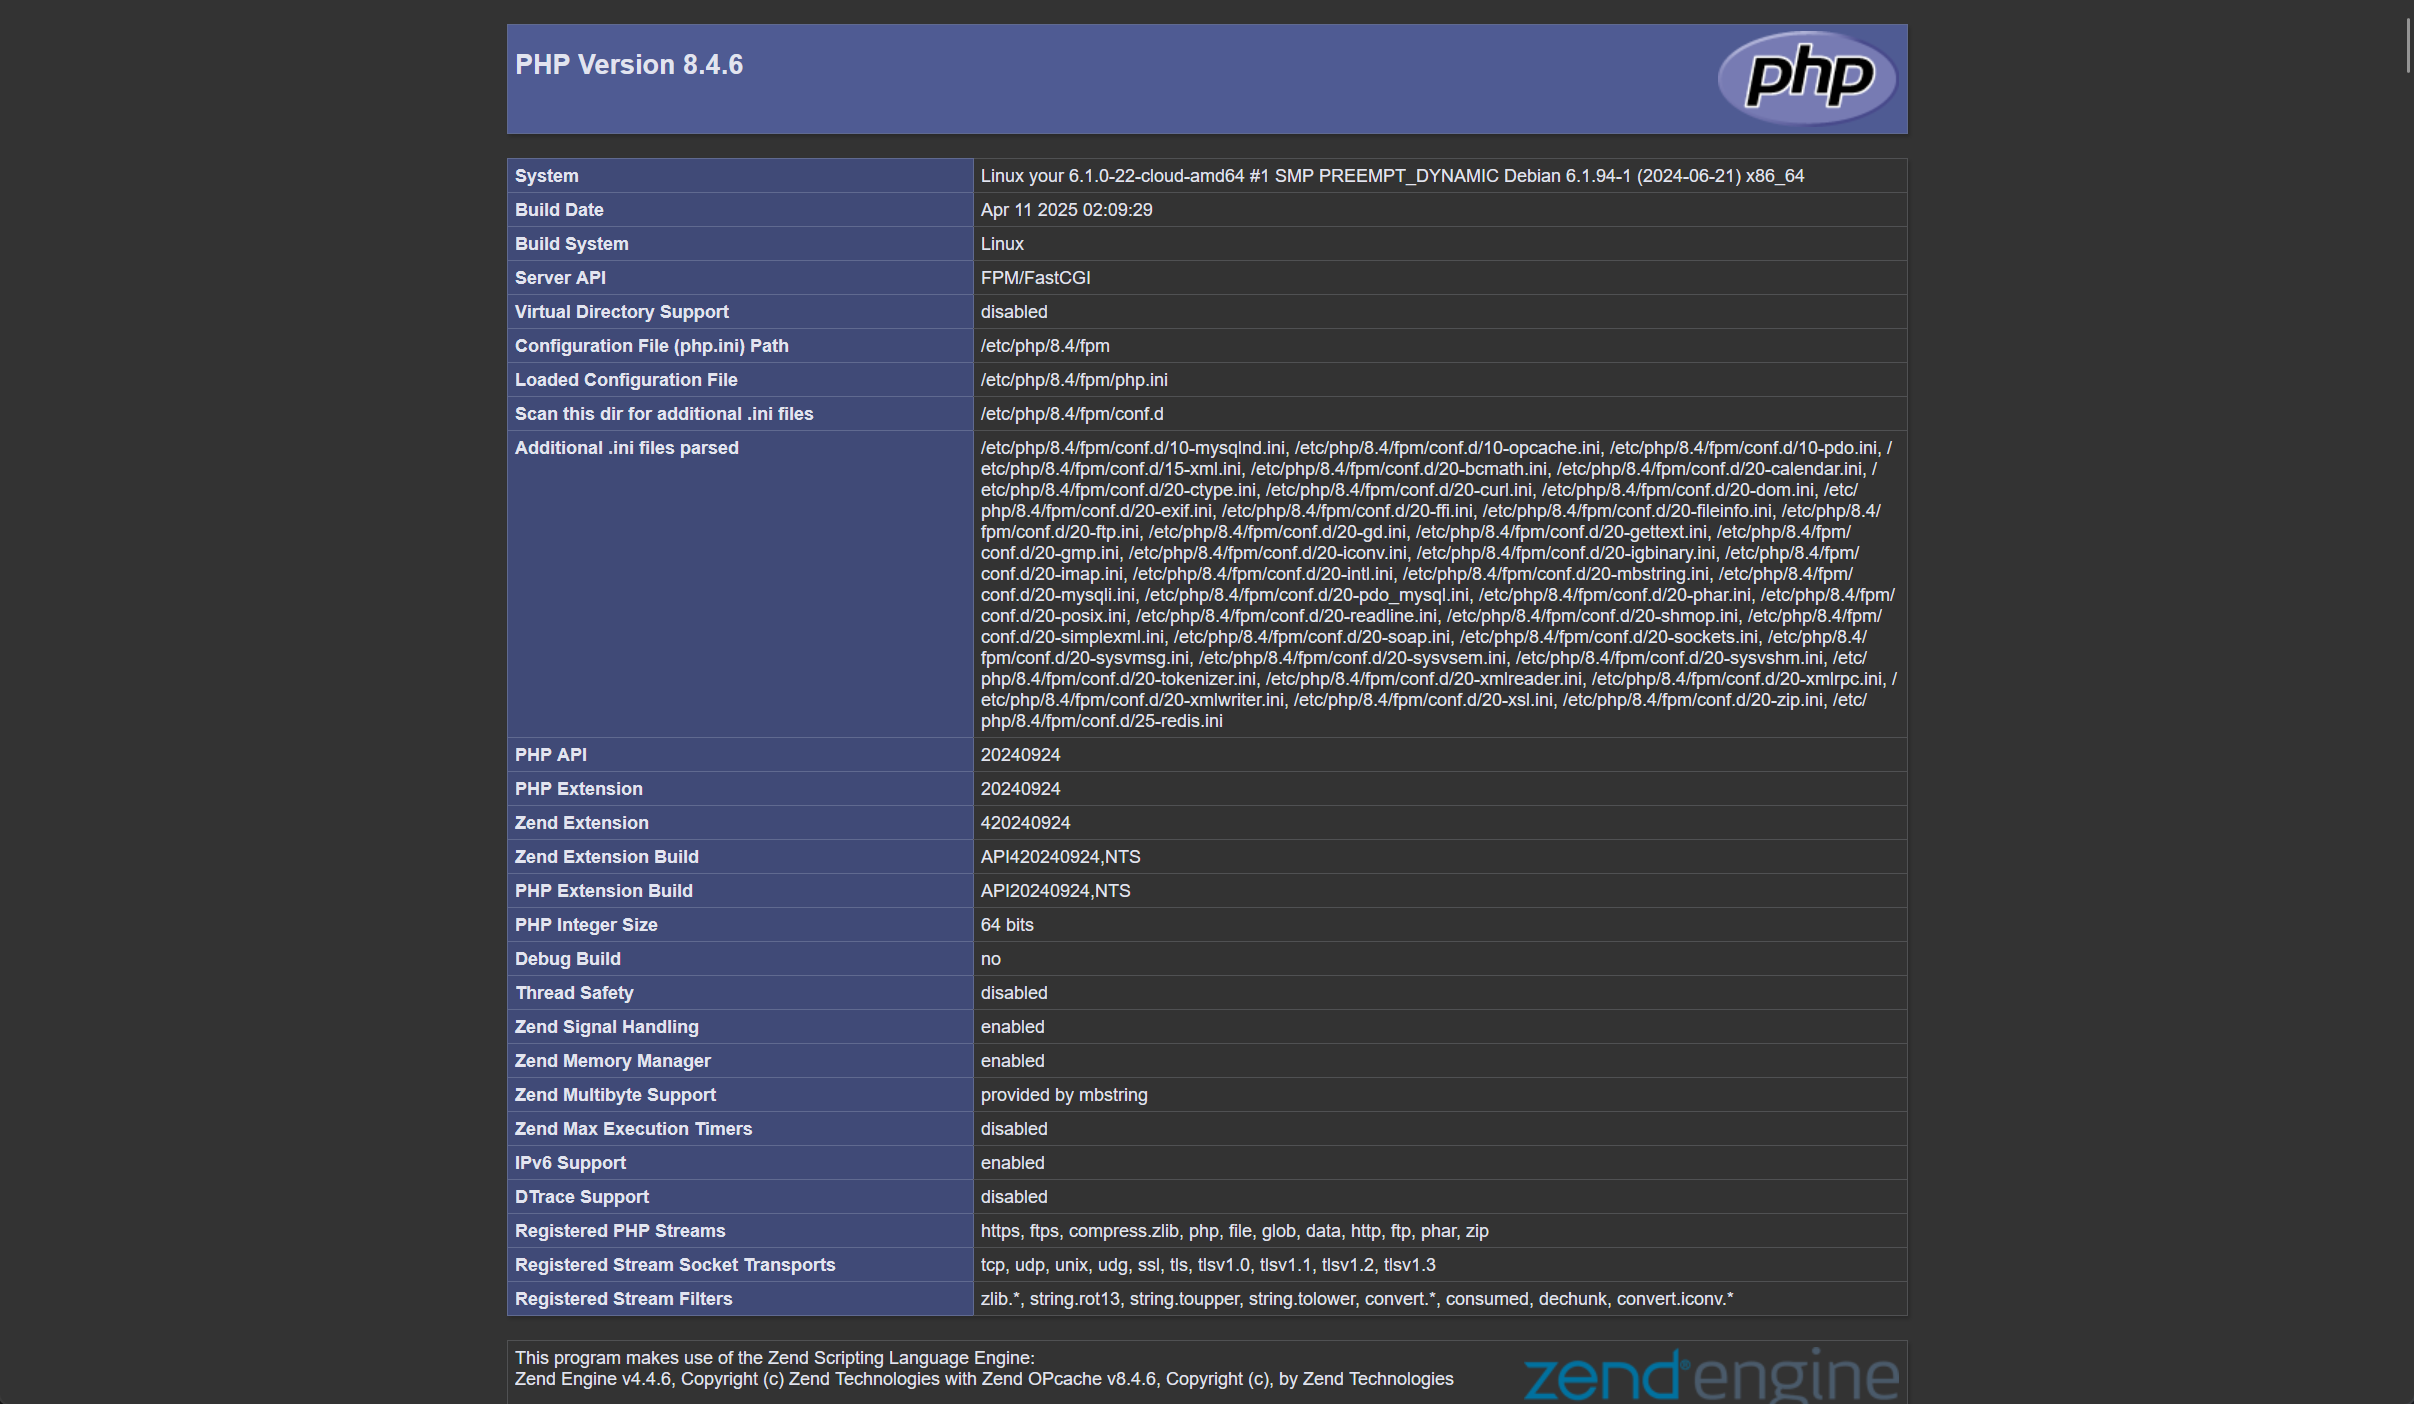
Create a phpinfo.php file to test PHP:
sudo -u www-data bash -c 'cat > /var/www/example.com/phpinfo.php << EOF
<?php phpinfo(); ?>
EOF'
phpinfo.php
Now, you can visit http://example.com/phpinfo.php in your browser, provided you have correctly set the A or AAAA DNS records for example.com.
4. Install MariaDB
We use MariaDB instead of MySQL, due to historical and licensing reasons.
4.1 Add GPG key
curl -sSL https://supplychain.mariadb.com/MariaDB-Server-GPG-KEY | gpg --dearmor > /usr/share/keyrings/mariadb.gpgAdd GPG key
4.2 Add repository
Debian:
echo "deb [arch=$(dpkg --print-architecture) signed-by=/usr/share/keyrings/mariadb.gpg] https://dlm.mariadb.com/repo/mariadb-server/11.8/repo/debian $(lsb_release -sc) main" > /etc/apt/sources.list.d/mariadb.list
Add Debian repository
Ubuntu:
echo "deb [arch=$(dpkg --print-architecture) signed-by=/usr/share/keyrings/mariadb.gpg] https://dlm.mariadb.com/repo/mariadb-server/11.8/repo/ubuntu $(lsb_release -sc) main" > /etc/apt/sources.list.d/mariadb.list
Add Ubuntu repository
4.3 Install MariaDB
apt update
apt install mariadb-server mariadb-client -y
Install MariaDB server and client
After installing MariaDB, you can run mariadb-secure-installation to set the root password and apply some basic security tweaks.
4.4 Create database and test
Before creating a database, it's a good idea to generate a random password. You can use tools like OpenSSL:
openssl rand -hex 16Random string with 16 characters
Or
openssl rand -base64 16Random string with 16 characters
Or you can install pwgen and use it:
apt install pwgen -y
pwgen 16
Random string with 16 characters
Now, let's log in to the MariaDB server using the root user. By default, MariaDB uses Unix domain socket authentication, which means you do not need to enter the root password to log in locally:
mariadb -u rootLog in using root
Create an example database called example_database:
CREATE DATABASE example_database DEFAULT CHARACTER SET utf8mb4 COLLATE utf8mb4_unicode_ci;Create MySQL database
Create an example user example_user and grant permissions:
GRANT ALL ON example_database.* TO 'example_user'@'localhost' IDENTIFIED BY 'Your_Powerful_Strong_Password';
FLUSH PRIVILEGES;
Create MySQL user
Now you can exit:
EXIT;Exit MariaDB console
Let's create a file named mysql-test.php in the /var/www/example.com directory:
sudo -u www-data bash -c 'cat > /var/www/example.com/mysql-test.php << EOF
<?php
\$dbname = '\''example_database\''; //MySQL database
\$dbuser = '\''example_user\''; //MySQL user
\$dbpass = '\''Your_Powerful_Strong_Password\'';
\$dbhost = '\''localhost\''; //use localhost if you install locally
\$link = mysqli_connect(\$dbhost, \$dbuser, \$dbpass) or die("Unable to Connect to \'\$dbhost\'");
mysqli_select_db(\$link, \$dbname) or die("Could not open the db \'\$dbname\'");
\$test_query = "SHOW TABLES FROM \$dbname";
\$result = mysqli_query(\$link, \$test_query);
\$tblCnt = 0;
while(\$tbl = mysqli_fetch_array(\$result)) {
\$tblCnt++;
#echo \$tbl[0]."<br />\n";
}
if (!\$tblCnt) {
echo "MySQL is working fine. There are no tables.";
} else {
echo "MySQL is working fine. There are \$tblCnt tables.";
}
?>
EOF'/var/www/example.com/mysql-test.php
Now you can visit http://example.com/mysql-test.php from your browser to verify the database connection.
If you see the message MySQL is working fine. There are no tables. on the web page, it means the connection is successful.


